まずは、OSX用のパッケージを取得します
(むろん、ソースからビルドしても全く問題ありません)
パッケージについてはこのページを参照して下さい
インストール後、ターミナル上で設定を行います
まずは、PATHの設定を行います
$ vi ~/.bash_profile
内容は以下の通りです
export PATH=/usr/local/bin:/opt/local/bin:/opt/local/sbin:$PATH
export MANPATH=/opt/local/share/man:$MANPATH
export LANG=ja_JP.UTF-8
export MANPATH=/opt/local/share/man:$MANPATH
export LANG=ja_JP.UTF-8
次に設定を反映し、PATHが通ったかを確認します
$ source ~/.bash_profile
$ svn --version
svn, version 1.4.4 (r25188)
compiled Jun 14 2007, 14:23:02
Copyright (C) 2000-2006 CollabNet.
Subversion is open source software, see http://subversion.tigris.org/
This product includes software developed by CollabNet (http://www.Collab.Net/).
The following repository access (RA) modules are available:
* ra_dav : Module for accessing a repository via WebDAV (DeltaV) protocol.
- handles 'http' scheme
- handles 'https' scheme
* ra_svn : Module for accessing a repository using the svn network protocol.
- handles 'svn' scheme
* ra_local : Module for accessing a repository on local disk.
- handles 'file' scheme
PATHが通っていることが確認できたら、リポジトリを作成します
場所、ディレクトリ名は任意ですが、例では/opt以下に作っています
# mkdir -p /opt/svn/repos
# svnadmin create /opt/svn/repos
# svnadmin create /opt/svn/repos
設定ファイルを作成します
# vi /opt/svn/repos/conf/svnserve.conf
内容は以下の通りです
[general]
anon-access = none
auth-access = write
password-db = passwd
anon-access = none
auth-access = write
password-db = passwd
ユーザーとパスワードの設定ファイルを作成します
# vi /opt/svn/repos/conf/passwd
内容は以下の通りです
(例としてユーザー名:foo、パスワード:barにて作成しています)
[users]
foo = bar
foo = bar
SVNサーバーをデーモンとして起動します
# svnserve -d -r /opt/svn/repos
動作確認ができたら、サービスとして登録します
Tigerからはinetd/xinetdではなく、launchdが使われます
launchdにサービスを登録するにはGUIツールのLingonを使うのが楽なのですが、今回はCUIでの設定方法を書きます
まず、launchdではplistファイルが登録するサービスの設定ファイルとなりますので、まずそれを作成します
# vi /Library/LaunchDaemons/org.tigris.subversion.svnserve.plist
内容は下記の通りです
<?xml version="1.0" encoding="UTF-8"?>
<!DOCTYPE plist PUBLIC "-//Apple Computer//DTD PLIST 1.0//EN"
"http://www.apple.com/DTDs/PropertyList-1.0.dtd">
<plist version="1.0">
<dict>
        <key>Label</key>
        <string>org.tigris.subversion.svnserve</string>
        <key>OnDemand</key>
        <true/>
        <key>Program</key>
        <string>/usr/local/bin/svnserve</string>
        <key>ProgramArguments</key>
        <array>
                <string>/usr/local/bin/svnserve</string>
                <string>-i</string>
                <string>-r</string>
                <string>/opt/svn/repos</string>
        </array>
        <key>ServiceDescription</key>
        <string>SVN Version Control System</string>
        <key>Sockets</key>
        <dict>
                <key>Listeners</key>
                <array>
                <dict>
                        <key>SockFamily</key>
                        <string>IPv4</string>
                        <key>SockServiceName</key>
                        <string>svnserve</string>
                        <key>SockType</key>
                        <string>stream</string>
                </dict>
                <dict>
                        <key>SockFamily</key>
                        <string>IPv6</string>
                        <key>SockServiceName</key>
                        <string>svnserve</string>
                        <key>SockType</key>
                        <string>stream</string>
                </dict>
                </array>
        </dict>
        <key>inetdCompatibility</key>
        <dict>
                <key>Wait</key>
                <false/>
        </dict>
</dict>
</plist>
設定ファイルを保存したら、下記コマンドでサービスを登録し、サービスを起動させます
# launchctl load /Library/LaunchDaemons/org.tigris.subversion.svnserve.plist
# launchctl start org.tigris.subversion.svnserve
# launchctl start org.tigris.subversion.svnserve
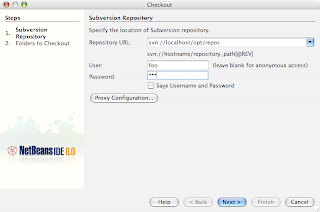
NetBeansから接続します
メニューの「Versioning > Subversion > Checkout...」を選択します

Checkoutウィンドウが開くので、先に設定したRepository URL、User、Passwordを設定します

「Next >」ボタンをクリックし、次画面に遷移します
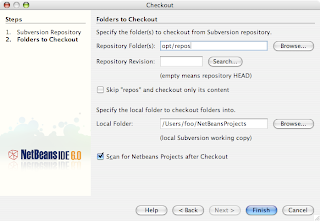
次にcheckout先のフォルダの設定を行います

「Finish」ボタンでcheckoutを開始します
以上が接続までの簡単な設定です
セキュリティも含めた細かい設定は機会があれば書きたいと思います
0 件のコメント:
コメントを投稿